
If you love getting creative without the fuss of complicated tools or massively messy setups, you’re going to love Gel Printing (also known as gelli plate printing). It’s fun, versatile, a little bit unpredictable and totally addictive.
In this post, we’ll break down what gel printing is, what you need to get started, and why it’s become one of my favorite things to do.
What Is Gel Printing?
Gel printing is a form of monoprinting that uses a soft, flexible plate (called a Gelli or Gel plate) to create one of a kind prints on paper or fabric. Think of it as a way to make beautiful art without needing a printing press or years of experience.
The Gelli plate is made from a gel-like material (either gelatin or a synthetic equivalent) that holds paint well and allows for layering, texture, and all kinds of creative expression. Once you’ve tried it, you’ll be hooked.
What You Need To Get Started
You don’t need a huge stash of supplies to begin. Here are the basics:
Optional extras (but super fun to use):
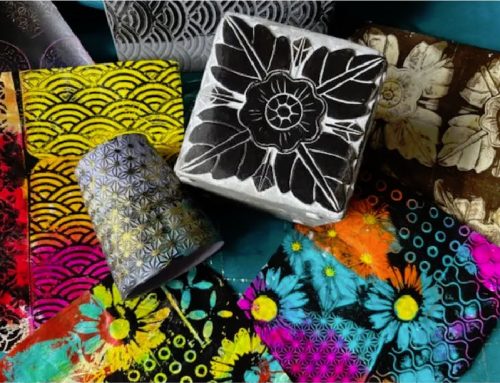
- Stencils and masks
- Natural textures (leaves, feathers, pinecones, shells)
- Tools for mark-making (legos,bubble wrap, thread spools)

How It Works: Step-by-Step
Here’s a simple overview of the Gel printing process:
- Apply small quantities of paint to your Gelli plate using a brayer.
- Add texture by pressing stencils, tools, or found objects into the paint.
- Lay your paper on top of the plate and smooth it down with your hands.
- Peel it off to reveal your print, ta-da!
You can also build up layers by letting your first print dry, adding new colours or textures, and printing again.
It’s a great way to experiment.
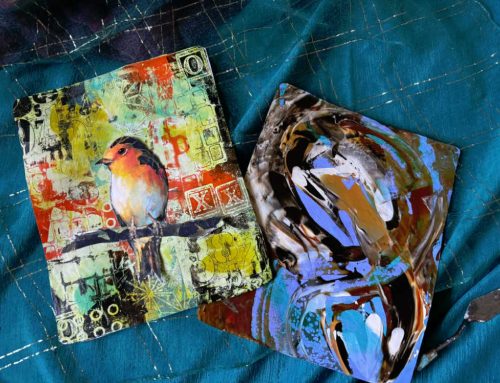
What Can You Make With Gelli Prints?
One of the best things about Gelli plate printing is how many ways you can use your creations:
- Art journal pages
- Handmade cards and envelopes
- Tags and wrapping paper
- Collage materials
- Wall art or framed prints
- DIY notebooks and bookmarks
- Ornaments
It’s perfect for mixed media lovers and paper crafters looking for fresh backgrounds and textures.

Why Gelli Printing Is So Much Fun
- There’s no right or wrong
- Every print is unique.
- It’s a creative stress reliever (and block-buster!), quick, playful, and satisfying.
- It encourages experimentation, happy accidents, and new ideas.
Once you start, it’s hard to stop. (Don’t say I didn’t warn you!)
Ready To Give It A Go?
If you’re curious to try Gelli plate printing for yourself, you’re in the right place. On this site, you’ll find video tutorials, inspiration, stencil supplies, and ideas to help you get started, or take your printing to the next level.
I also have a YouTube channel with over 150 videos / shorts including lots about Gelli Plate Printing,
Join The Fun
Whether you’re a curious beginner or a seasoned creative, gelli plate printing is a beautiful way to play with colour, texture, and self-expression.
Have a go.
Make a mess.
Create something beautiful!
And remember to tag me @chakramandalas on Instagram, or join my Facebook Group (button below) Gelli Plate Fun — I’d love to see what you create!

Loving this art form